дёҠдёҖзҜҮеҚҡе®ўд»Ӣз»ҚдәҶж ‘иҺ“жҙҫ(raspberry)дёҠдҪҝз”ЁspiжҺҘеҸЈзҡ„oledеұҸ幕пјҢд»ҠеӨ©е°ұеҶҚжҠҠйӮЈдёӘеұҸ幕用еҲ°beaglebone black(BBB)дёҠйқўпјҢз”Ёе®ғжқҘдҪҝbeaglebone blackжңүдёӘжҳҫзӨәжҸҗзӨәеҠҹиғҪпјҢеҸҜд»Ҙз”ЁжқҘи°ғиҜ•зӯү.еұҸ幕иҝҳжҳҜйӮЈдёӘпјҡ0.98еҜёзҡ„oledеұҸ幕пјҢssd1306дё»жҺ§иҠҜзүҮ,128*64зҡ„еҲҶиҫЁзҺҮгҖӮгҖҖ
дёӘдәәеҺҹеҲӣпјҢзүҲжқғжүҖжңүпјҢиҪ¬иҪҪиҜ·жіЁжҳҺеҺҹж–ҮеҮәеӨ„пјҢ并дҝқз•ҷеҺҹж–Үй“ҫжҺҘпјҡ
http://www.embbnux.com/2014/08/10/beaglebone_black_use_spi_oled_ssd1306/
beagleboneе’Ңж ‘иҺ“жҙҫдёҖж ·д№ҹжңүеҫҲеӨҡgpioеҸЈжҸҗдҫӣз»ҷз”ЁжҲ·пјҢиҖҢдё”жӣҙеӨҡпјҢиө„жәҗд№ҹеҫҲдё°еҜҢгҖӮ

ејҖе§Ӣиҝӣе…ҘжӯЈйўҳеҗ§пјҡ
дёҖгҖҖйҰ–е…ҲиҝҳжҳҜиҝӣиЎҢиҝһзәҝпјҡ
spi oledзҡ„жҺҘеҸЈе’Ңд№ӢеүҚзҡ„дёҖж ·:
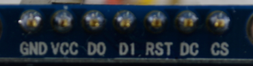
иҝһзәҝ:
GNDгҖҖ>>гҖҖBeaglebone blackзҡ„P9_1з®Ўи„ҡд№ҹе°ұжҳҜGND
VCCгҖҖ>>гҖҖBeaglebone blackзҡ„P9_3еҚіVDD_3V3
CSВ В В В >>гҖҖBeaglebone blackзҡ„P9_17(SPI0_CS0)
DC В В >>гҖҖ Beaglebone blackзҡ„ P9_15В
RSTВ >>В В Beaglebone blackзҡ„ P9_12
D1(MOSI) >> Beaglebone blackзҡ„SPI0_D1(P9_18)
D0(SCLK) >> Beaglebone blackзҡ„SPI0_SCLK(P9_22)
дәҢгҖҖеңЁbeaglebone blackдёҠејҖеҗҜspiжҺҘеҸЈ
з”өи„‘з”ЁusbзәҝиҝһжҺҘдёҠbeaglebone blackеҗҺпјҢз”өи„‘дёҠдјҡеӨҡеҮәдёҖдёӘзЈҒзӣҳеҲҶеҢәпјҡBEAGLEBONEпјҢиҝҷдёӘжҳҜbeaglebone blackдёҠemmcдёҠзҡ„дёҖдёӘеҲҶеҢәпјҢйҮҢйқўзҡ„ж–Ү件е°ұжҳҜbeaglebone blackзҡ„й…ҚзҪ®ж–Ү件гҖӮ
з”Ёж–Үжң¬зј–иҫ‘еҷЁжү“ејҖuEnv.txt
еңЁйҮҢйқўжңҖеҗҺдёҖиЎҢеҠ е…ҘдёӢйқўзҡ„иҜӯеҸҘпјҡ
optargs=capemgr.enable_partno=BB-SPIDEV0
йҮҚж–°еҗҜеҠЁbeaglebone blackеҗҺдјҡеңЁ/devзӣ®еҪ•дёӢж–°еўһдёӢйқўдёӨдёӘж–Ү件пјҡгҖҖspidev1.0гҖҖspidev1.пј‘
еҜ№еә”зҡ„жҳҜbeaglebone blackзҡ„spiжҺҘеҸЈ
иҝҷж ·е°ұејҖеҗҜдәҶ
дёүгҖҖдҪҝз”Ёpythonж“ҚдҪңoledеҮҶеӨҮ
е…ҲжҳҜе®үиЈ…зӣёеә”зҡ„еә“е’ҢзЁӢеәҸпјҡ
жҲ‘beaglebone blackзҡ„зі»з»ҹзӣ®еүҚжҳҜangstromпјҢеҰӮжһңжҳҜubuntuзҡ„зңӢеҶҚдёӢйқў
angstromпјҡ
дҪҝз”Ёsshзҷ»йҷҶеҲ°жқҝеӯҗдёҠпјҡssh [email protected]
/usr/bin/ntpdate -b -s -u pool.ntp.org opkg update opkg install task-native-sdk opkg install python-pip python-setuptools opkg install python-dev opkg install python-misc #дёҚе®үиЈ…зҡ„иҜқдҪҝз”ЁpythonжҸҗзӨәжүҫдёҚеҲ°contextlibпјҡNo module named contextlib opkg install python-imaging python-smbus pip install Adafruit_BBIO opkg install git git clone https://github.com/adafruit/Adafruit_Python_SSD1306.git
gitзҡ„ж—¶еҖҷеҮәзҺ°дәҶдёҖдёӢй—®йўҳпјҡ
error:В while accessing https://github.com/adafruit/Adafruit_Python_SSD1306.git/info/refs
fatal: HTTP request failed
еҺҹеӣ жҳҜgitдёҠдҪҝз”ЁhttpsйңҖиҰҒйӘҢиҜҒпјҢи§ЈеҶіпјҡ
git config --global http.sslverify false
git clone https://github.com/adafruit/Adafruit_Python_SSD1306.git
继з»ӯпјҡ
cd Adafruit_Python_SSD1306

python setup.py install
еҰӮжһңжҸҗзӨәй”ҷиҜҜ:
subprocess.CalledProcessError: Command ‘[‘curl’, ‘https://pypi.python.org/packages/source/s/setuptools/setuptools-3.5.1.zip’, ‘–silent’, ‘–output’, ‘/home/root/python/Adafruit_Python_SSD1306/setuptools-3.5.1.zip’]’ returned non-zero exit status 77
еҲҷдёӢиҪҪhttps://pypi.python.org/packages/source/s/setuptools/setuptools-3.5.1.zipпјҢж”ҫеҲ°Adafruit_Python_SSD1306зӣ®еҪ•дёӢпјҢеҶҚжү§иЎҢВ python setup.py install
ubuntuзҡ„ж“ҚдҪңеҰӮдёӢпјҡ
sudo apt-get update sudo apt-get install build-essential python-dev python-pip sudo pip install Adafruit_BBIO sudo apt-get install python-imaging python-smbus sudo apt-get install git git cloneВ В https://github.com/adafruit/Adafruit_Python_SSD1306.git cd Adafruit_Python_SSD1306 sudo python setup.py install
еӣӣгҖҖзј–еҶҷpythonзЁӢеәҸжөӢиҜ•жҳҫзӨәеұҸ
ж–°е»әspioled.py:
import time
import Adafruit_GPIO.SPI as SPI
import Adafruit_SSD1306
import Image
import ImageDraw
import ImageFont
# Beaglebone Black pin configuration:
RST = 'P9_12'
# Note the following are only used with SPI:
DC = 'P9_15'
SPI_PORT = 1
SPI_DEVICE = 0
disp = Adafruit_SSD1306.SSD1306_128_64(rst=RST, dc=DC, spi=SPI.SpiDev(SPI_PORT, SPI_DEVICE, max_speed_hz=8000000))
# Initialize library.
disp.begin()
# Clear display.
disp.clear()
disp.display()
# Create blank image for drawing.
# Make sure to create image with mode '1' for 1-bit color.
width = disp.width
height = disp.height
image = Image.new('1', (width, height))
# Get drawing object to draw on image.
draw = ImageDraw.Draw(image)
# Draw a black filled box to clear the image.
draw.rectangle((0,0,width,height), outline=0, fill=0)
# Draw some shapes.
# First define some constants to allow easy resizing of shapes.
padding = 2
shape_width = 20
top = padding
bottom = height-padding
# Move left to right keeping track of the current x position for drawing shapes.
x = padding
# Draw an ellipse.
draw.ellipse((x, top , x+shape_width, bottom), outline=255, fill=0)
x += shape_width+padding
# Draw a rectangle.
draw.rectangle((x, top, x+shape_width, bottom), outline=255, fill=0)
x += shape_width+padding
# Draw a triangle.
draw.polygon([(x, bottom), (x+shape_width/2, top), (x+shape_width, bottom)], outline=255, fill=0)
x += shape_width+padding
# Draw an X.
draw.line((x, bottom, x+shape_width, top), fill=255)
draw.line((x, top, x+shape_width, bottom), fill=255)
x += shape_width+padding
# Load default font.
font = ImageFont.load_default()
# Alternatively load a TTF font.
# Some other nice fonts to try: http://www.dafont.com/bitmap.php
#font = ImageFont.truetype('Minecraftia.ttf', 8)
# Write two lines of text.
draw.text((x, top),В В В 'Hello',В font=font, fill=255)
draw.text((x, top+20), 'World!', font=font, fill=255)
# Display image.
disp.image(image)
disp.display()
еҰӮжһңжІЎд»»дҪ•й—®йўҳзҡ„иҜқжү§иЎҢиҜҘзЁӢеәҸпјҢеә”иҜҘе°ұжҳҜжү§иЎҢдәҶпјҡ
python spioled.py жҲ–иҖ…гҖҖsudo python spioled.py
жҳҫзӨәеҰӮдёӢпјҡ

еҸӮиҖғж–Үз« пјҡ
https://learn.adafruit.com/ssd1306-oled-displays-with-raspberry-pi-and-beaglebone-black/